
Understand Push and Pull Compensation
Embroidery is nothing like print — it’s a unique medium with its own rules. That sounds obvious, but it’s a crucial distinction to understand, especially for anyone new to digitizing and learning the embroidery basics of push and pull compensation.
A beginner might digitize a design on screen exactly as it appears in the printed form, and it looks perfect, only to find that it appears distorted or misaligned once stitched out. Why? Because unlike print, embroidery interacts with a physical medium—fabric—and this medium fights back.
This is one of the key concepts that distinguishes embroidery from graphic design: push and pull compensation, often simply referred to as "Pull Comp."

Why You Need to Understand Pull Compensation
When a needle punctures fabric and thread is stitched, tension is created. This tension distorts the original design, affecting its shape and proportions.
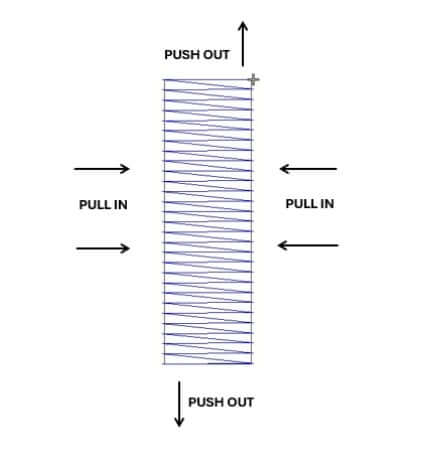
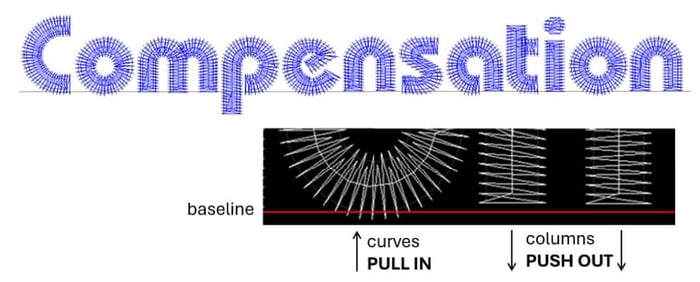
Pull:
This refers to the way thread tension draws stitches inward. As the needle and thread work through the fabric, the tension causes the width of the stitches to contract. This is most noticeable across the width of satin columns or shapes.
Push:
This is the opposite effect that happens at the ends of stitch columns. As stitches build up in length, they push the fabric outward, effectively extending beyond the intended edge. This is why long satin columns often end up longer than digitized.
In short:
Pull makes stitches narrower, pulling them inward along their width.
Push makes stitches longer, pushing them outward along their length.
Without proper compensation, the stitched-out design will not match the vector graphic supplied by your customer.
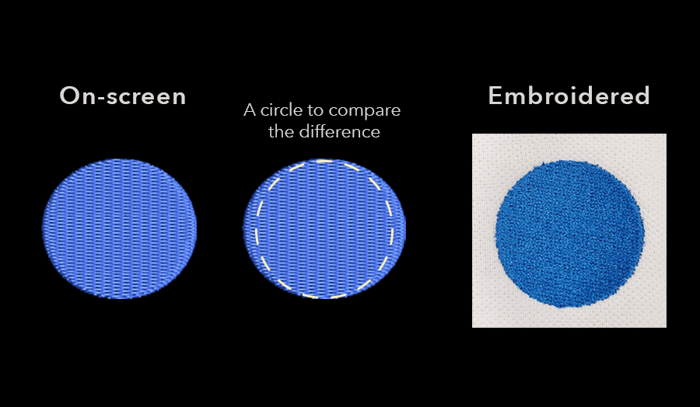
- A perfect circle turns into an oval
- Lettering baselines appear uneven
- Satin columns are longer than intended
Outlines become misaligned
A digitizer must account for this and apply compensation.

What is Push and Pull Compensation?
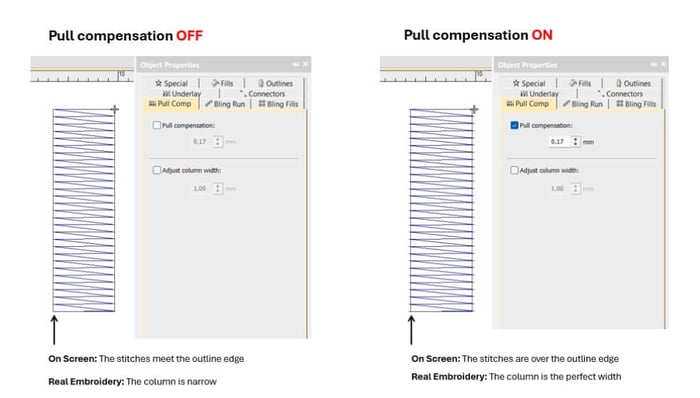
In simple terms, pull compensation adds width to your stitches during digitizing to balance out how the fabric reacts during embroidery.
You are intentionally overcompensating—adding just enough extra width so that, once the fabric pulls and compresses during stitching, the final result appears correct.
It’s an invisible correction, but it makes all the difference between a professional-quality result and a disappointing one.
When Pull Compensation Matters Most
FONTS:
Keep Lettering on a Perfect Baseline: Lettering is particularly sensitive to pull. Left uncorrected, certain letters may appear smaller or drift off the baseline. Pull compensation keeps them sharp, legible, and aligned.
CIRCLES:
Digitize Perfect Circles: Without push and pull compensation, circles can flatten into ovals. Adding the right amount helps maintain symmetry and ensures a visually balanced result—even on tricky fabrics.
OUTLINES:
Outlines and Registration: Whether it’s a run stitch outline or a satin border, outlines rely on precise placement. The natural push and pull of embroidery can throw this off. Try slightly stepping the outline inward.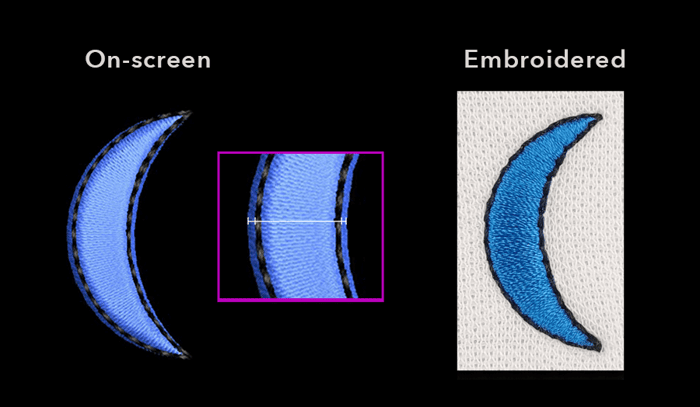
COLUMNS:
Maintain Satin Columns at the Right Length
Long satin stitches tend to pull in the sides and push out at the ends. Compensating for this ensures your satin elements keep their intended shape and don’t end up skinny or distorted.
Factors That Affect Pull Comp
Several things influence how much pull compensation you’ll need:
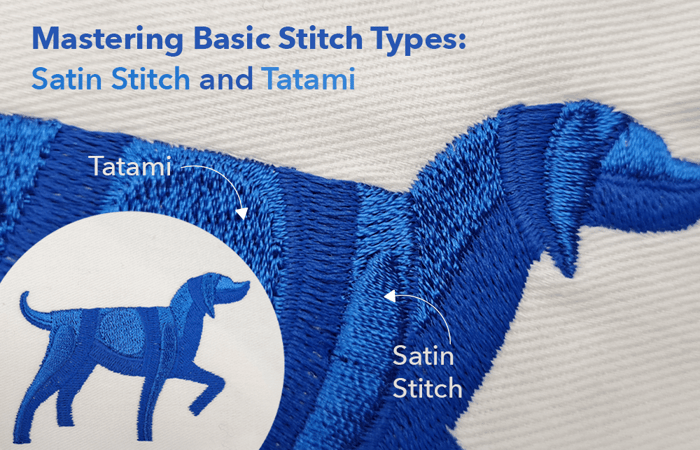
🔹 Stitch Type
- Satin Stitch has the most visible pull effect. It pulls inward (along the sides) and pushes out (at the ends), especially in long or narrow columns.
- Tatami Stitch shows less pull comp overall but is still affected, especially over large fill areas.
🔹 Fabric Type
Knits stretch more than woven fabrics, so pull compensation must be increased to account for extra movement. Every fabric reacts differently—testing is essential.
🔹 Object Size
The bigger the object, the more obvious the pull comp. A small pull compensation setting that’s unnoticeable in a 10mm letter becomes very obvious in a 100mm satin border.
Over time, experience helps you use every tool at your disposal to manage pull compensation effectively. Including the best pull comp settings for you.
Underlay Plays a Role, Too
Pull compensation works best when combined with good underlay stitching.
- Edge Run underlay helps anchor the stitch edges to prevent pulling inwards and distortion.
- Zigzag Underlay provides a solid foundation for the top stitches, especially in columns and large satin areas. A double zigzag underlay (run in both directions) provides extra stability and minimizes distortion.
These underlay stitches support your pull compensation, helping your embroidery hold its shape.
Stabilizers Matter, Too
Stabilizers add essential support from underneath the fabric. By keeping the fabric taut and minimizing stretch or movement during stitching, stabilizers work hand-in-hand with your underlay and pull compensation settings to prevent distortion and ensure crisp, accurate embroidery.
When to Adjust Push and Pull Compensation
There’s no universal formula for push and pull compensation. The correct adjustment comes with experience and depends on several factors, including fabric type, stitch style, object size, and machine tension..... That’s why testing is critical.
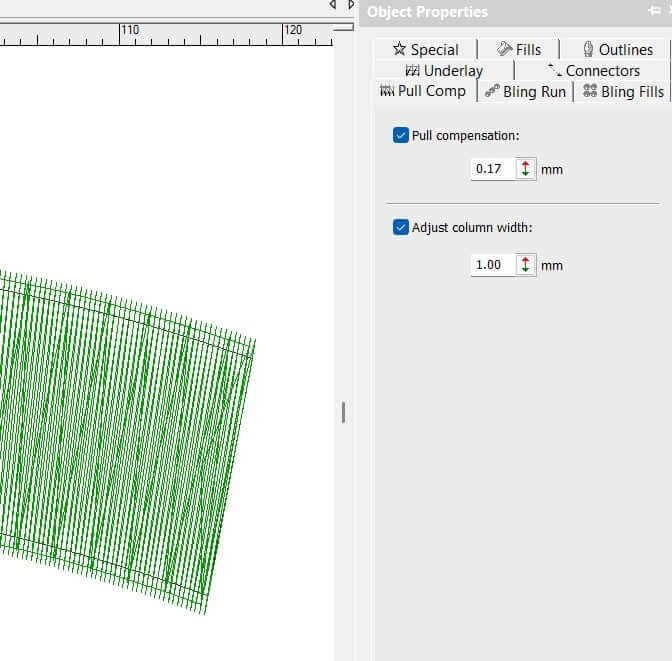
Wilcom’s EmbroideryStudio makes this process simpler:
- Use object-based editing to control pull compensation per element
- Access and adjust pull comp values in the Object Properties Docker (Default settings are available to get you started)
- And remember: test, test, test—it’s the only way to truly see the effects.
Pull Compensation options are available in every level of EmbroideryStudio software and can be found in the Object Properties Docker.
Ask about the world's
favorite embroidery software!

Got questions? We’re here to help.
Contact us