Embroidery Stitch Techniques
Embroidery Stitch Techniques
Great embroidery combines creativity with technical skill. Many decorative effects are built on the foundations of core stitch types. Once you understand how these stitches behave, you can begin exploring more advanced embroidery stitch techniques to enhance your designs.
In this blog, we’ll look at two of the most important stitches used in embroidery digitizing—Satin Stitch and Tatami Stitch—and then take things a step further by looking at more advanced techniques.
Satin Stitch

A Core Stitch Type
Satin Stitch is well known for its smooth, glossy appearance, making it ideal for lettering, borders, and decorative details. This stitch creates a polished and professional finish, especially in small to medium design areas. However, achieving the best results requires careful control of stitch width and length.
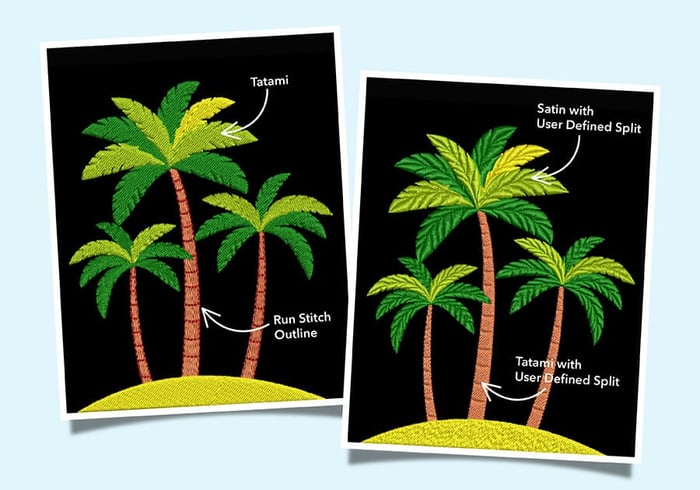
< IMAGE: The left column uses Satin Stitch with Auto Split applied.
Key Characteristics of Satin Stitch
Appearance: Satin Stitch produces a dense, smooth surface that reflects light, giving embroidery designs a refined and premium look.
Maximum Width: For best results, the recommended maximum width is around 10 mm, although Satin Stitch can extend up to 12 mm in some situations. Wider stitches—up to 15 mm—are possible but increase the risk of thread snagging.
Best Applications: This stitch type works particularly well for lettering, borders, and detailed elements that require a clean and polished finish.
Fabric Compatibility: Satin Stitch performs well on both knit and woven fabrics. However, it is not suitable for filling large areas because the long stitches may become unstable.
Embroidery Stitch Techniques for Satin Stitch
One common issue with Satin Stitch is excessively long stitches, which can cause threads to snag or loosen over time. Wilcom has several embroidery stitch techniques that can help solve this challenge.
Auto Split
The Auto Split function automatically divides long stitches into smaller segments. This reduces the risk of snagging while randomly distributing needle penetrations to prevent visible stitch lines.
Tip: Using an Auto Split around 7 mm helps preserve the satin look while improving durability.

Custom Splits
For greater control, the Custom Split feature (included with the Designing-level subscription) allows digitizers to manually position needle penetrations. These User Defined Splits make it easier to maintain stitch stability while creating custom design effects.
Although this technique may slightly increase stitch count, it gives designers more flexibility while maintaining the elegant shine of Satin Stitch.
Tatami Stitch
A Fill Stitch for Larger Areas
While Satin Stitch works best for smaller decorative elements, Tatami Stitch is designed for filling larger spaces. This stitch creates a flat, textured finish and is widely used for backgrounds and broader design areas.
Key Characteristics of Tatami Stitch
Appearance: Tatami Stitch produces a textured surface with lower thread density compared to Satin Stitch.
Best Applications: Ideal for large fills, backgrounds, and shapes where a consistent and stable surface is required.
Fabric Suitability: Tatami works well across many fabric types and can also act as a global underlay to stabilize embroidery elements.
Limitations: Less suitable for small, detailed areas.
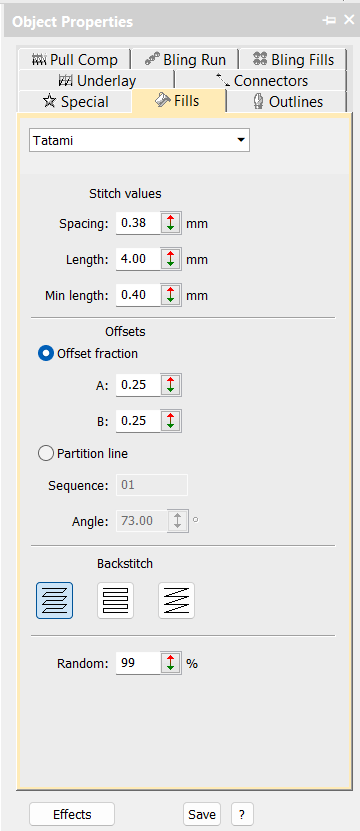
Common Tatami Stitch Settings
- Spacing: 0.38mm
- Length: 4mm
- Offset fraction: 0.25
- Back Stitch: edge finish
- Random: as a percentage
✨Tips: EmbroideryStudio Designing includes advanced stitch effects that expand Tatami capabilities. Features such as Accordion Spacing and Florentine Fill can be used for smooth curves and creative blending in the MULTI BLEND tool.

Tatami and Satin Stitches are used in this horse design.
Advanced Tatami Techniques

Contour Stitch: Follow the curves and create a lighter, textured effect while maintaining good coverage and lowering stitch count.
- The Stamping Tool allows you to place patterned penetration holes in the Tatami fill to create decorative textures.
- Partition line help align penetration points, allowing you to create structured textures or subtle patterns within the fill.
- The Random setting increases the random stitch value and introduces irregularity to the stitch pattern, which can be useful when digitizing fur, feathers, or organic textures.
- Offset Fraction controls how each row of stitches shifts relative to the previous row. Adjusting this value can produce more even stitch distribution or unique patterned effects.
- Tatami Backstitch refers to the stitch that runs back along every second row of a Tatami fill. This setting controls how the edges of the fill are completed, helping create cleaner borders and better overall design structure.
Add Detail with Offset Fraction
Offset adjustments allow digitizers to control needle penetration placement, helping distribute stitches more evenly or create distinctive texture effects.
By carefully adjusting offset values or partition lines, you can intentionally shape stitch penetration paths to enhance detail and definition within a design.
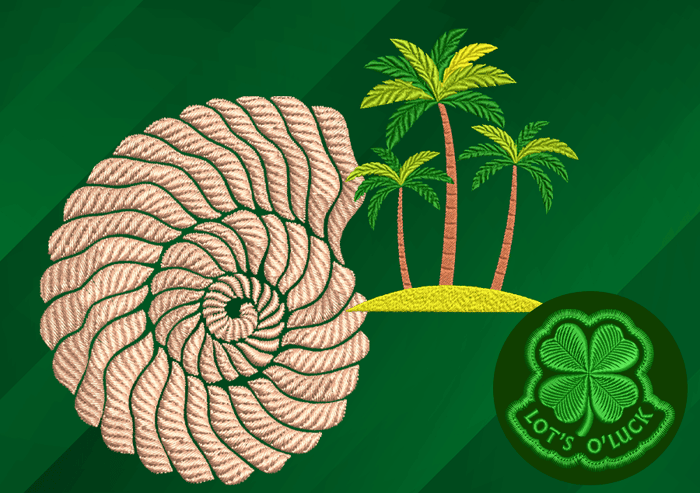
This technique is demonstrated in the shell example, where stitch placement adds subtle structure and visual depth.


Both Satin and Tatami stitches offer a wide range of variations, and experimenting with their settings is key to mastering advanced embroidery stitch techniques.
Using the Object Properties docker in EmbroideryStudio, you can easily adjust stitch settings to create unique textures, finishes, and creative design effects.
Start experimenting and bring your embroidery designs to life.

Why EMB Matters
Wilcom .EMB files are object-based, fully editable, and scalable—making them the industry-standard embroidery file format for professional digitizing.
From a single EMB file, you can easily output to all major machine formats while keeping your design fully editable for future adjustments.
Start experimenting today!
Ask about the world's
favorite embroidery software!

Got questions? We’re here to help.
Contact us